Welcome to GongMH's Blog!
keep study.-
golang基础-02-字符串
字符串的相关操作也是实际项目中常用的功能。
1. 字符串声明
var str string2. 字符串长度
len(str)3. 字符串操作
strings包中包含了很多字符串的操作,例如,取子串索引
Index*,字符串切分Split*,大小写转换ToUpper*与ToLower*,去除字符Trim*,字符串替换Replace,以及字符串映射函数Map等。关于字符串相关操作的一些例子如下,也可以运行一下。
package main

import (
    "fmt"
    s "strings"
    "unicode"
    "unicode/utf8"
)


func main() {
    var p = fmt.Println

    //1. func IndexByte(s string, c byte) int
    //IndexByte 返回c在s中第一次出现的位置,-1表示c在s中不存在
    p("IndexByte:", s.IndexByte("abc", 'a'))    //IndexByte: 0
    p("IndexByte:", s.IndexByte("abc", 'd'))    //IndexByte: -1

    //2. func Count(s, substr string) int
    //Count 返回substr在s中出现的次数,如果substr为空返回1 + (s的unicode长度)
    p("Count:", s.Count("abcabc", "ab"))    //Count: 2
    p("Count:", s.Count("a你好c你好", "好"))    //Count: 2
    p("Count:", s.Count("abcabc", "ac"))    //Count: 0
    p("Count:", s.Count("abcabc", ""))        //Count: 7
    p("Count:", s.Count("abc你好", ""))    //Count: 6
    p("Count:", s.Count("", ""))    //Count: 1

    //3. func Contains(s, substr string) bool
    //Contains 返回s中是否包含substr
    p("Contains:", s.Contains("abc", "ab"))    //Contains: true
    p("Contains:", s.Contains("abc", "ac"))    //Contains: false
    p("Contains:", s.Contains("abc", ""))        //Contains: true
    p("Contains:", s.Contains("", ""))            //Contains: true
    p("Contains:", s.Contains("您好", "好"))    //Contains: true

    //4. func ContainsAny(s, chars string) bool
    //ContainsAny 返回s中是否包含一个chars中的unicode字符
    p("ContainsAny:", s.ContainsAny("abc", "ab"))    //ContainsAny: true
    p("ContainsAny:", s.ContainsAny("abc", "ac"))    //ContainsAny: true
    p("ContainsAny:", s.ContainsAny("abc", ""))    //ContainsAny: false
    p("ContainsAny:", s.ContainsAny("", ""))        //ContainsAny: false
    p("ContainsAny:", s.ContainsAny("您好", "好"))    //ContainsAny: true

    //5. func ContainsRune(s string, r rune) bool
    //ContainsRune 返回s中是否包含unicode字符r
    p("ContainsRune:", s.ContainsRune("abc", 97))        //ContainsRune: true
    p("ContainsRune:", s.ContainsRune("abc", 100))        //ContainsRune: false
    p("ContainsRune:", s.ContainsRune("中国", 0x4e2d))    //ContainsRune: true 注:0x4e2d为中的unicode编码

    //6. func LastIndex(s, substr string) int
    //LastIndex 返回substr在s中最后出现的index,-1表示c在s中不存在
    p("LastIndex:", s.LastIndex("abcbc", "bc"))    //LastIndex: 3
    p("LastIndex:", s.LastIndex("abcbc", "cd"))    //LastIndex: -1

    //7. func IndexRune(s string, r rune) int
    //IndexRune 返回unicode字符r在s中第一次出现的位置,-1表示r在s中不存在
    p("IndexRune:", s.IndexRune("abc", 98))        //IndexRune: 1
    p("IndexRune:", s.IndexRune("abc", 100))        //IndexRune: -1
    p("IndexRune:", s.IndexRune("s中国", 0x4e2d))    //IndexRune: 1 TODO: 需确认
    p("IndexRune:", s.IndexRune("abc", utf8.RuneError))    //IndexRune: -1

    //8. func IndexAny(s, chars string) int
    //IndexAny 返回s中第一个包含chars中的unicode字符的位置,-1表示不存在
    p("IndexAny:", s.IndexAny("abc", "cdb"))    //IndexAny: 1
    p("IndexAny:", s.IndexAny("abc", "de"))    //IndexAny: -1
    p("IndexAny:", s.IndexAny("中国人", "汉人"))    //IndexAny: 6  TODO: 需确认

    //9. func LastIndexAny(s, chars string) int
    //LastIndexAny 返回s中最后一个包含chars中unicode字符的位置,-1表示不存在
    p("LastIndexAny:", s.LastIndexAny("abc", "dcb"))    //LastIndexAny: 2
    p("LastIndexAny:", s.LastIndexAny("abc", "de"))    //LastIndexAny: -1
    p("LastIndexAny:", s.LastIndexAny("中国人", "汉人"))    //LastIndexAny: 6  TODO: 需确认

    //10. func LastIndexByte(s string, c byte) int
    //LastIndexByte 返回s中包含字符c的最后一个位置,-1表示不存在
    p("LastIndexByte:", s.LastIndexByte("abc", 'c'))    //LastIndexByte: 2
    p("LastIndexByte:", s.LastIndexByte("abc", 'd'))    //LastIndexByte: -1
    p("LastIndexByte:", s.LastIndexByte("a中国人c", 'c'))    //LastIndexByte: 10 TODO: 需确认

    //11. func SplitN(s, sep string, n int) []string
    //SplitN 将字符串s按照sep分隔,返回分割后的字符串slice。
    // n < 0 : 返回分割后所有的字符串
    // n = 0 : 返回nil,即空的slice
    // n > 0 : 返回最多n个子串,最后一个子串不做分隔
    p("SplitN:", s.SplitN("bcaddada", "a", -1))    //SplitN: [bc dd d ]
    p("SplitN:", s.SplitN("bcaddada", "a", 0))    //SplitN: []
    p("SplitN:", s.SplitN("bcaddada", "a", 2))    //SplitN: [bc ddada]

    //12. func SplitAfterN(s, sep string, n int) []string
    //SplitAfterN 将字符串s按照sep分隔,返回分割后的字符串slice,并且每个子串都含有分隔符。
    // n < 0 : 返回分割后所有的字符串
    // n = 0 : 返回nil,即空的slice
    // n > 0 : 返回最多n个子串,最后一个子串不做分隔
    p("SplitAfterN:", s.SplitAfterN("abcaddada", "a", -1))    //SplitAfterN: [a bca dda da ]
    p("SplitAfterN:", s.SplitAfterN("abcaddada", "a", 0))    //SplitAfterN: []
    p("SplitAfterN:", s.SplitAfterN("abcaddada", "a", 2))    //SplitAfterN: [a bcaddada]

    //13. func Split(s, sep string) []string
    //Split 将字符串s按照sep分隔,返回分割后的字符串slice
    p("Split:", s.Split("abcaddaba", "ab"))    //Split: [ cadd a]
    p("Split:", s.Split("abcaddada", "af"))    //Split: [abcaddada]
    p("Split:", s.Split("abcaddada", ""))    //Split: [a b c a d d a d a]

    //14. func SplitAfter(s, sep string) []string
    //Split 将字符串s按照sep分隔,返回分割后的字符串slice,并且每个子串都含有分隔符。
    p("SplitAfter:", s.SplitAfter("abcaddaba", "ab"))    //SplitAfter: [ab caddab a]
    p("SplitAfter:", s.SplitAfter("abcaddada", "af"))    //SplitAfter: [abcaddada]
    p("SplitAfter:", s.SplitAfter("abcaddada", ""))    //SplitAfter: [a b c a d d a d a]

    //15. func Fields(s string) []string
    //Fields 将字符串s根据空白符分隔为子串
    //var asciiSpace = [256]uint8{'\t': 1, '\n': 1, '\v': 1, '\f': 1, '\r': 1, ' ': 1}
    p("Fields:", s.Fields("a\tb cc\nd"))    //Fields: [a b cc d]
    p("Fields:", s.Fields("abcd"))    //Fields: [abcd]

    //16. func FieldsFunc(s string, f func(rune) bool) []string
    //FieldsFunc 将字符串s根据自定义函数分割为子串,满足函数f的字符即为分隔符
    f := func(c rune) bool {
        return !unicode.IsLetter(c) && !unicode.IsNumber(c)
    }
    p("FieldsFunc:", s.FieldsFunc("  foo1;bar2,baz3...", f))    //FieldsFunc: [foo1 bar2 baz3]

    //17. func Join(a []string, sep string) string
    //Join 将字符串slice a通过sep拼接起来
    p("Join:", s.Join([]string{"1","a","中"}, "-"))    //Join: 1-a-中

    //18. func HasPrefix(s, prefix string) bool
    //HasPrefix 判断字符串s是否适以prefix开始
    p("HasPrefix:", s.HasPrefix("abc213123", "ab"))    //HasPrefix: true
    p("HasPrefix:", s.HasPrefix("abc213123", "ac"))    //HasPrefix: false

    //19. func HasSuffix(s, suffix string) bool
    //HasSuffix 判断字符串s是否适以suffix结尾
    p("HasSuffix:", s.HasSuffix("abc213123", "23"))    //HasSuffix: true
    p("HasSuffix:", s.HasSuffix("abc213123", "2"))        //HasSuffix: false

    //20. func Map(mapping func(rune) rune, s string) string
    //Map 将字符串s根据mapping函数做转换
    replaceNotLatin := func(r rune) rune {
        if unicode.Is(unicode.Latin, r) {
            return r
        }
        return '?'
    }
    p("Map:", s.Map(replaceNotLatin, "Hello\255World"))    //Map: Hello?World

    //21. func Repeat(s string, count int) string
    //Repeat 将字符串s重复count次,count为负数会panic,count为0返回空字符串
    // overflow panic. SEE ISSUE: https://github.com/golang/go/issues/16237
    p("Repeat:", s.Repeat("abc", 3))    //Repeat: abcabcabc
    p("Repeat:", s.Repeat("", 3))    //Repeat:
    p("Repeat:", s.Repeat("abc", 0))    //Repeat:

    //22.func ToUpper(s string) string
    //ToUpper 将小写字符转为大写
    p("ToUpper:", s.ToUpper("a。B,cd\nfE中"))    //ToUpper: A。B,CD\nFE中

    //23.func ToLower(s string) string
    //ToLower 将大写字符转为小写
    p("ToLower:", s.ToLower("a。B,cd\nfE中"))    //ToLower: a。b,cd\nfe中

    //24. func ToTitle(s string) string
    //ToTitle 将字符串s转为title
    p("ToTitle:", s.ToTitle("hello Go"))    //ToTitle: HELLO GO
    p("ToTitle:", s.ToTitle("хлеб"))    //ToTitle: ХЛЕБ

    //25. func TrimLeftFunc(s string, f func(rune) bool) string
    //TrimLeftFunc 对字符串s,从前到后判断字符是否满足f,满足则去除并继续判断,不满足返回剩余字符串
    f25 := func(r rune) bool {
        return !unicode.IsLetter(r) && !unicode.IsNumber(r)
    }
    p("TrimLeftFunc:", s.TrimLeftFunc("¡¡¡Hello, Gophers!!!", f25))    //TrimLeftFunc: Hello, Gophers!!!

    //26. func TrimRightFunc(s string, f func(rune) bool) string
    //TrimRightFunc 对字符串s,从后到前判断字符是否满足f,满足则去除并继续判断,不满足返回剩余字符串
    f26 := func(r rune) bool {
        return !unicode.IsLetter(r) && !unicode.IsNumber(r)
    }
    p("TrimRightFunc:", s.TrimRightFunc("¡¡¡Hello, Gophers!!!", f26))    //TrimRightFunc: ¡¡¡Hello, Gophers

    //27. func TrimFunc(s string, f func(rune) bool) string
    //TrimFunc 对字符串s,从两端判断字符是否满足f,满足则去除并继续判断,不满足返回剩余字符串
    f27 := func(r rune) bool {
        return !unicode.IsLetter(r) && !unicode.IsNumber(r)
    }
    p("TrimFunc:", s.TrimFunc("¡¡¡Hello, Gophers!!!", f27))    //TrimRightFunc: Hello, Gophers

    //28. func IndexFunc(s string, f func(rune) bool) int
    //IndexFunc 字符串s中第一个满足f的的索引,-1表示没有符合条件的字符
    f28 := func(c rune) bool {
        return unicode.Is(unicode.Han, c)
    }
    p("IndexFunc:", s.IndexFunc("Hello, 世界", f28))    //IndexFunc: 7
    p("IndexFunc:", s.IndexFunc("Hello, world", f28))    //IndexFunc: -1


    //29. func LastIndexFunc(s string, f func(rune) bool) int
    //LastIndexFunc 字符串s中第一个满足f的的索引,-1表示没有符合条件的字符
    f29 := func(c rune) bool {
        return unicode.Is(unicode.Han, c)
    }
    p("LastIndexFunc:", s.LastIndexFunc("Hello, 世界", f29))    //LastIndexFunc: 10
    p("LastIndexFunc:", s.LastIndexFunc("Hello, world", f29))    //LastIndexFunc: -1

    //30. func Trim(s string, cutset string) string
    //Trim 去除字符串s两端满足cutset的字符
    p("Trim:", s.Trim("¡¡¡Hello! Gophers!!!", "!¡"))    //Trim: Hello! Gophers

    //31. func TrimLeft(s string, cutset string) string
    //TrimLeft 去除字符串s左端满足cutset的字符
    p("TrimLeft:", s.TrimLeft("¡¡¡Hello! Gophers!!!", "!¡"))    //TrimLeft: Hello! Gophers!!!

    //32. func TrimRight(s string, cutset string) string
    //TrimRight 去除字符串s右端满足cutset的字符
    p("TrimRight:", s.TrimRight("¡¡¡Hello! Gophers!!!", "!¡"))    //TrimRight: ¡¡¡Hello! Gophers

    //33. func TrimSpace(s string) string
    //TrimSpace 去除s两端的空白符
    //var asciiSpace = [256]uint8{'\t': 1, '\n': 1, '\v': 1, '\f': 1, '\r': 1, ' ': 1}
    p("TrimSpace:", s.TrimSpace(" ab cd eef \t "))    //TrimSpace: ab cd eef

    //34. func TrimPrefix(s, prefix string) string
    //TrimPrefix 去除字符串s的前缀,如果不是,则返回s
    p("TrimPrefix:", s.TrimPrefix("abcabcab", "abc"))    //TrimPrefix: abcab
    p("TrimPrefix:", s.TrimPrefix("abcabcab", "ac"))    //TrimPrefix: abcabcab

    //35. func TrimSuffix(s, suffix string) string
    //TrimSuffix 去除字符串s的后缀,如果不是,则返回s
    p("TrimSuffix:", s.TrimSuffix("abcabcab", "ab"))    //TrimSuffix: abcabc
    p("TrimSuffix:", s.TrimSuffix("abcabcab", "ac"))    //TrimSuffix: abcabcab


    //36. func Replace(s, old, new string, n int) string
    //Replace 将字符串s中的old替换为new,如果old为空,将s中每个字符前后插入new,即len(s)+1个new
    // n < 0,不限制替换的个数;n = 0,不替换;n > 0,最多替换n个
    p("Replace:", s.Replace("abcbcbc", "cb", "cbd", -1))    //Replace: abcbdcbdc
    p("Replace:", s.Replace("abcbcbc", "", "cbd", -1))    //Replace: abcbdcbdc
    p("Replace:", s.Replace("abcbcbc", "cb", "cbd", 0))        //Replace: abcbcbc
    p("Replace:", s.Replace("abcbcbc", "cb", "cbd", 1))        //Replace: abcbdcbc


    //37. func EqualFold(s, t string) bool
    //EqualFold 判断字符串s、t是否相等,大小写不敏感
    p("EqualFold:", s.EqualFold("abca", "ABcA"))    //EqualFold: true
    p("EqualFold:", s.EqualFold("abca", "abcd"))    //EqualFold: false
    p("EqualFold:", s.EqualFold("中国", "中国"))    //EqualFold: true

    //38. func Index(s, substr string) int
    //Index 返回substr在s中第一次出现的位置,-1表示未出现
    p("Index:", s.Index("abc", "bc"))    //Index: 1
    p("Index:", s.Index("abc", "bd"))    //Index: -1
}
4. 字符串和其他类型的转换
strconv包实现了字符串与基础类型的相互转换。4.1 数字转换
最常用的字符转换是,字符串转整数
Atoi和整数转字符串Itoa。(此时假设都是十进制)i, err := strconv.Atoi("-42") s := strconv.Itoa(-42)4.2
Prase相关函数–字符串转为其他ParseBool,ParseFloat,ParseInt, 和ParseUint将字符串转为相应类型。b, err := strconv.ParseBool("true") f, err := strconv.ParseFloat("3.1415", 64) i, err := strconv.ParseInt("-42", 10, 64) u, err := strconv.ParseUint("42", 10, 64)prase函数(float64, int64, and uint64)默认放回的是64位,但是可以通过转换,变成需要的类型,如下。
s := "2147483647" // biggest int32
i64, err := strconv.ParseInt(s, 10, 32)
//...
i := int32(i64)
4.3
Format相关函数–其他类型转为字符串FormatBool,FormatFloat,FormatInt, 和FormatUint将值转为字符串。s := strconv.FormatBool(true) s := strconv.FormatFloat(3.1415, 'E', -1, 64) s := strconv.FormatInt(-42, 16) s := strconv.FormatUint(42, 16)4.4
Append相关函数–字符串追加值AppendBool,AppendFloat,AppendInt和AppendUint将格式化后的字符追加到des后面。4.5
Quote相关函数Quote将字符串转为转义字符串,运行一下。fmt.Printf("%#v\n", sc.QuoteToASCII(`Hello, 世界`)) //"\"Hello, \\u4e16\\u754c\"" fmt.Printf("%#v\n", sc.Quote("Hello, \t世界")) //"\"Hello, \\t世界\"" fmt.Printf("%#v\n", "Hello, 世界") //"Hello, 世界" str, _ := sc.Unquote(sc.Quote(`Hello, 世界`)) fmt.Printf("%#v\n", str) //"Hello, 世界"4.6
strconv常用例子strconv包中常见的例子,运行一下。package main import ( "fmt" sc "strconv" ) var p = fmt.Println func main() { //1. func ParseBool(str string) (bool, error) //ParseBool 解析字符串str的bool值,其他值返回错误 //接受值为:1, t, T, TRUE, true, True, 0, f, F, FALSE, false, False. resp1, err1 := sc.ParseBool("True") p("ParseBool:", resp1, err1) //ParseBool: true <nil> resp1, err1 = sc.ParseBool("0") p("ParseBool:", resp1, err1) //ParseBool: false <nil> resp1, err1 = sc.ParseBool("yes") p("ParseBool:", resp1, err1) //ParseBool: false strconv.ParseBool: parsing "yes": invalid syntax //2. func FormatBool(b bool) string //FormatBool 根据传入的布尔值b,返回true or false p("FormatBool:", sc.FormatBool(true)) //FormatBool: true p("FormatBool:", sc.FormatBool(false)) //FormatBool: false //3. func AppendBool(dst []byte, b bool) []byte //AppendBool 根据b的值,将"true"或"false"追加到dst后,并返回结果 var byteVar3 []byte p("AppendBool:", string(sc.AppendBool(byteVar3, false))) //AppendBool: false p("AppendBool:", string(sc.AppendBool(byteVar3, true))) //AppendBool: true //`...`是golang中的语法糖,跟在slice后面可以将slice打散成元素类型,也可以在函数入参作为不定参 // slice = append([]byte("hello "), "world"...) // func append(slice []Type, elems ...Type) []Type //4. func ParseFloat(s string, bitSize int) (float64, error) //ParseFloat 将字符串s转为float,根据bitSize是32或64转为float32或float64 resp4, err4 := sc.ParseFloat("3.14", 64) p("ParseFloat:", resp4, err4) //ParseFloat: 3.14 <nil> resp4, err4 = sc.ParseFloat("3.1415926", 32) p("ParseFloat:", resp4, err4) //ParseFloat: 3.141592502593994 <nil> resp4, err4 = sc.ParseFloat("3.14f", 64) p("ParseFloat:", resp4, err4) //ParseFloat: 0 strconv.ParseFloat: parsing "3.14f": invalid syntax //5. func FormatFloat(f float64, fmt byte, prec, bitSize int) string //FormatFloat 根据fmt和prec将f转为字符串;prec表示精度,负数表示保留全部,非负数表示保留小数 //fmt 取值如下 // 'b' (-ddddp±ddd, a binary exponent), // 'e' (-d.dddde±dd, a decimal exponent), // 'E' (-d.ddddE±dd, a decimal exponent), // 'f' (-ddd.dddd, no exponent), // 'g' ('e' for large exponents, 'f' otherwise), or // 'G' ('E' for large exponents, 'f' otherwise). p("FormatFloat:", sc.FormatFloat(3.1415926, 'f', -5, 64)) //FormatFloat: 3.1415926 p("FormatFloat:", sc.FormatFloat(3.1415926, 'f', 2, 64)) //FormatFloat: 3.14 //6. func AppendFloat(dst []byte, f float64, fmt byte, prec, bitSize int) []byte //AppendFloat 将f根据fmt、prec转为字符串,然后追加到dst后返回 var byteVar6 []byte = []byte{'3', '1'} p("AppendFloat:", string(sc.AppendFloat(byteVar6, 3.1415926, 'f', -5, 64))) //AppendFloat: 313.1415926 p("AppendFloat:", string(sc.AppendFloat(byteVar6, 3.1415926, 'f', 3, 64))) //AppendFloat: 313.142 //7. func ParseInt(s string, base int, bitSize int) (i int64, err error) //ParseInt 将字符串s转为整数 // 进制base 取值[2, 36],取0自动检测字符串的进制 // Bit sizes 0, 8, 16, 32, and 64. For a bitSize below 0 or above 64 an error is returned. resp7, err7 := sc.ParseInt("123456", 0, 64) p("ParseInt:", resp7, err7) //ParseInt: 123456 <nil> resp7, err7 = sc.ParseInt("3.14", 0, 64) p("ParseInt:", resp7, err7) //ParseInt: 0 strconv.ParseInt: parsing "3.14": invalid syntax resp7, err7 = sc.ParseInt("0123456", 0, 64) p("ParseInt:", resp7, err7) //ParseInt: 42798 <nil> resp7, err7 = sc.ParseInt("10101", 1, 64) p("ParseInt:", resp7, err7) //ParseInt: 0 strconv.ParseInt: parsing "10101": invalid base 1 //8. func ParseUint(s string, base int, bitSize int) (uint64, error) //ParseUint 将字符串s转为整数,参数取值通ParseInt resp8, err8 := sc.ParseUint("123456", 0, 64) p("ParseUint:", resp8, err8) //ParseUint: 123456 <nil> resp8, err8 = sc.ParseUint("-123456", 0, 64) p("ParseUint:", resp8, err8) //ParseUint: 0 strconv.ParseUint: parsing "-123456": invalid syntax //9. func Atoi(s string) (int, error) //Atoi 将字符串s转为十进制的int resp9, err9 := sc.Atoi("1234") p("Atoi:", resp9, err9) //Atoi: 1234 <nil> resp9, err9 = sc.Atoi("-1234") p("Atoi:", resp9, err9) //Atoi: -1234 <nil> //10. func Itoa(i int) string //Itoa 将int i转为字符串 p("Itoa:", sc.Itoa(1234)) //Itoa: 1234 p("Itoa:", sc.Itoa(-1234)) //Itoa: -1234 //11. func FormatInt(i int64, base int) string //FormatInt 将整数i转为指定进制的整数 //base 取值[2, 36],用a-z表示大于等于10的数;base取其他值panic p("FormatInt:", sc.FormatInt(15, 2)) //FormatInt: 1111 p("FormatInt:", sc.FormatInt(0x15, 8)) //FormatInt: 25 p("FormatInt:", sc.FormatInt(37, 36)) //FormatInt: 11 // p("FormatInt:", sc.FormatInt(37, 37)) //panic //12. func FormatUint(i uint64, base int) string //FormatUint 将正整数i转为指定进制的整数 //base 取值[2, 36],用a-z表示大于等于10的数;base取其他值panic p("FormatUint:", sc.FormatUint(15, 2)) //FormatUint: 1111 //13. func AppendInt(dst []byte, i int64, base int) []byte //AppendInt 将i转为base进制的字符串,追加到dst后 var byteVar13 = []byte{'1'} p("AppendInt:", string(sc.AppendInt(byteVar13, 15, 2))) //AppendInt: 11111 //14. func AppendUint(dst []byte, i uint64, base int) []byte //AppendUint 将i转为base进制的字符串,追加到dst后 var byteVar14 = []byte{'1'} p("AppendUint:", string(sc.AppendUint(byteVar14, 15, 2))) //AppendUint: 11111 //15. func Quote(s string) string //Quote p("Quote:", sc.Quote("Hello, \t世界")) //Quote: "Hello, \t世界" p("WithoutQuote:", "Hello, \t世界") //WithoutQuote: Hello, 世界 //16. func Unquote(s string) (string, error) //Unquote resp16, err16 := sc.Unquote(sc.Quote("Hello, \t世界")) p("Unquote:", resp16, err16) //Unquote: Hello, 世界 <nil> }
-
golang基础-01-array、slice和map
1. array
1.1 声明数组
数组具有特定的长度和元素类型类型,如上面intArr是长度为5的元素类型int的数组。
var intArr [5]int fmt.Println(intArr) //output: [0 0 0 0 0]数组默认具有零值,例如int即为0等。
1.2 声明并初始化数组
intArrNew := [5]int{1, 2, 3, 4, 5}
fmt.Println(intArrNew)         //output: [1 2 3 4 5]
1.3 获取数组长度
通过golang内置函数
len()fmt.Println(len(intArr)) //output: 51.4 数组元素存取
通过索引获取或修改数组的值
intArr[1] = 100
fmt.Println("set:", a)      //output: set: [0 100 0 0 0]
fmt.Println("get:", a[4])   //output: get: 100
1.5 多维数组
var twoDArr [2][3]int
for i := 0; i < len(twoDArr); i++ {
    for j := 0; j < len(twoDArr[i]); j++ {
        twoDArr[i][j] = i + j
    }
}
fmt.Println(twoDArr)        //output: [[0 1 2] [1 2 3]]
2. slice
slice在golang中应用更加广泛。
2.1 声明slice
声明slice类似声明数组,但是不需要支持元素的数量,如下所示。
var intSlice []int2.2 声明并初始化slice
intSliceNew := []int{1, 2, 3, 4, 5}2.3 slice元素存取
新声明的slice没有指向存储空间,直接为slice赋值,会报panic。 需要为slice分配空间,然后使用。
//1. 分配空间前
// intSlice[1] = 10            // panic: runtime error: index out of range
fmt.Printf("slice addr: %p, value:%v \n", intSlice, intSlice)
// slice addr: 0x0, value:[]

//2. 分配空间
intSlice = make([]int, 1, 2)
fmt.Printf("slice addr: %p, value:%v \n", intSlice, intSlice)
// slice addr: 0xc0000166a0, value:[0]

//3. 通过index设置
intSlice[0] = 13
fmt.Println(intSlice[0])
fmt.Printf("slice addr: %p, value:%v \n", intSlice, intSlice)
// slice addr: 0xc0000166a0, value:[13]

//4. 未超过容量前,通过append追加
intSlice = append(intSlice, 14)
fmt.Printf("slice addr: %p, value:%v \n", intSlice, intSlice)
// slice addr: 0xc0000166a0, value:[13 14]

//5. 超过容量后,通过append追加
//intSlice[2] = 13            // panic: runtime error: index out of range
intSlice = append(intSlice, 12)
fmt.Printf("slice addr: %p, value:%v \n", intSlice, intSlice)
// slice addr: 0xc000018280, value:[13 14 12]
上面我们可以看到slice的存取可以使用类似数组的方法,通过索引来操作。
但是,slice在未申请存储空间前,以及申请存储后越界访问,都会报
panic。golang内置的
append可以对slice做追加,当slice有足够的存储空间是,返回的还是之前的slice,但是当append超过slice的容量时,会生成一个新的slice返回。因此使用append方法追加的时候,需要接收append的返回值。通过查看slice的地址,可以看到超过容量以后,再给slice追加,slice的地址从
0xc0000166a0变为了0xc000018280。2.4 slice的长度
通过golang内置函数
len()fmt.Println(len(intSlice)) //output: 32.5 多维slice
var twoDSlice [][]int
twoDSlice = make([][]int, 3)
for i := 0; i < len(twoDSlice); i++ {
    twoDSlice[i] = make([]int, 2)
    for j := 0; j < len(twoDSlice[i]); j++ {
        twoDSlice[i][j] = i + j
    }
}
fmt.Println(twoDSlice)        //output: [[0 1] [1 2] [2 3]]
3. map
3.1 map声明
var m map[string]int3.2 声明并初始化map
mNew := map[string]int{
    "key1": 10,
    "key2": 11,
}
3.3 map的存取
和slice一样,在使用map前需要分配存储空间,否则会报panic。
//1. 分配空间前
//m["key1"] = 10       // panic: assignment to entry in nil map

//2. 分配空间
m = make(map[string]int)

//3. 设置值
m["key1"] = 10
m["key2"] = 20
fmt.Println(m, len(m))           // map[key1:10 key2:20] 2

//4. 获取值
value1 := m["key1"]
fmt.Println("value1:", value1)    // value1: 10
fmt.Println(m, len(m))            // map[key1:10 key2:20] 2

_, exist := m["k2"]
fmt.Println("exist:", exist)      // exist: false

//5. 删除值
delete(m, "key2")
fmt.Println(m, len(m))    // map[key1:10] 1
获取map对应key的value时,除了返回key对应的value,还会返回一个可选的返回值,表示key是否在map中存在。
当key存在时,可选返回值为true;当key不存在,可选返回值为false,返回的value为对应的零值。
3.4 map的长度
fmt.Println(len(m)) //output: 1
-
linux中library -- 基础知识
1. 引言
In computer science, a library is a collection of non-volatile resources used by computer programs, often for software development. These may include configuration data, documentation, help data, message templates, pre-written code and subroutines, classes, values or type specifications.
在计算机科学中,库(library)是用于开发软件的子程序集合。库和可执行文件的区别是,库不是独立程序,他们是向其他程序提供服务的代码。
2. 基础
程序库的引入使程序更加模块化化,编译更快,而且更容易更新。
2.1 linux中库的分类
程序库可以分为三种:静态库(static libraries)和共享库(shanred libraries)。
静态库是程序在编译时,将库内容加入到可执行程序中,在linux中静态库通常以
.a结尾。共享库是可以被多个程序共享使用,而不是在生成程序的时候被链接器拷贝到可执行程序中,共享库在linux中以.so结尾。而另外存在的动态加载库(dynamically loaded libraries)在程序执行时,根据需要动态加载共享库。
2.2 库文件在文件系统中的路径
大多数系统都倾向于遵守GNU的标准,即默认放在
/usr/local/lib目录下。FHS(Filesystem Hierarchy Standard)推荐,大多数的库文件应该放入/usr/lib目录下,系统启动需要的库文件放在/lib目录下,非系统库文件的放在/usr/local/lib下。其实二者并不冲突,GNU推荐是的开发者的源码,而FHS推荐的是发布者,发布者可以通过系统的包管理工具选择性地覆盖源码。注意,如果我们的库文件只能通过其他库文件调用,我们的库文件应该放在/usr/local/libexec或/usr/libexec。特别需要注意的是,基于Red Hat的系统并没有将
/usr/local/lib目录引入到默认的库搜索路径下,因此我们的centos也会出现这样的问题。可以在/etc/ld.so.conf加入上面的路径,也可以通过设置环境变量LD_LIBRARY_PATH来解决。以centos为例,库文件一般在以下几个地方存在,如果是64位系统,下面路径可能还会存在
*/lib64/。另外,在linux中
usr并不是user的意思,而是unix system resrouces的缩写,本人已经被误导了多年。/lib/ /usr/lib/ /usr/local/lib/ # /var/lib/2.3 库文件的版本
表示、文件名、版本、elf 共享库以lib为前缀,例如
libhello.so.x.y.z表示共享库hello。后面x.y.z是版本号,x是主版本号(Major Version Number),y是次版本号(Minor Version Number),z是发布版本号(Release Version Number)。主版本号(不兼容):重大升级,不同主版本的库之间的库是不兼容的。所以如果要保证向后兼容就不能删除旧的动态库的版本。
次版本号(向下兼容): 增量升级,增加一些新的接口但保留原有接口。高次版本号的库向后兼容低次版本号的库。
发布版本号(相互兼容):库的一些诸如错误修改、性能改进等,不添加新接口,也不更改接口。主版本号和次版本号相同的前提下,不同发布版本之间完全兼容。
Linux采用SO-NAME( Shortfor shared object name)的命名机制来记录共享库的依赖关系。每个共享库都有一个对应的“SO-NAME”(共享库文件名去掉次版本号和发布版本号)。比如共享库名为libhello.so.3.8.2,那么它的SO-NAME就是libhello.so.3。
在Linux系统中,系统会为每个共享库所在的目录创建一个跟SO-NAME相同的并且指向它的软连接(Symbol Link)。这个软连接会指向目录中主版本号相同、次版本号和发布版本号最新的共享库。也就是说,比如目录中有两个共享库版本分别为:/lib/libtest.so.3.8.2和/lib/libtest.so.3.7.5,那么软连接/lib/libtest.so.3指向/lib/libtest.so.3.8.2。
建立以SO-NAME为名字的软连接的目的是,使得所有依赖某个共享库的模块,在编译、链接和运行时,都使用共享库的SO-NAME,而不需要使用详细版本号。在编译生产ELF文件时候,如果文件A依赖于文件B,那么A的链接文件中的”.dynamic”段中会有DT_NEED类型的字段,字段的值就是B的SO-NAME。这样当动态链接器进行共享库依赖文件查找时,就会依据系统中各种共享库目录中的SO-NAME软连接自动定向到最新兼容版本的共享库。
当我们在编译器里使用共享库的时候,如用GCC的“-l”参数链接共享库libtXXX.so.3.8.1,只需要在编译器命令行指定 -l XXX 即可,省略了前缀和版本信息。编译器会根据当前环境,在系统中的相关路径(往往由-L参数指定)查找最新版本的XXX库。这个XXX就是共享库的“链接名”。不同类型的库可能有相同的链接名,比如C语言运行库有静态版本(libc.a)也动态版本(libc.so.x.y.z)的区别,如果在链接时使用参数”-lc”,那么连接器就会根据输出文件的情况(动态/静态)来选择合适版本的库。eg. ld使用“-static”参数时吗,”-lc”会查找libc.a;如果使用“-Bdynamic”(默认),会查找最新版本的libc.so.x.y.z。
2.4 常见的库文件
libc是 Linux 下的 ANSI C 函数库。glibc是 Linux 下的 GUN C 函数库。libc++是针对clang编译器特别重写的C++标准库,那libstdc++自然就是gcc的事儿了。clang与libc++的关系就像libstdc++与gcc。再说说libstdc++,glibc的关系。 libstdc++与gcc是捆绑在一起的,也就是说安装gcc的时候会把libstdc++装上。 那为什么glibc和gcc没有捆绑在一起呢? 相比glibc,libstdc++虽然提供了c++程序的标准库,但它并不与内核打交道。对于系统级别的事件,libstdc++首先是会与glibc交互,才能和内核通信。相比glibc来说,libstdc++就显得没那么基础了。(本段内容待确认)
2.5 常用常量
LD_LIBRARY_PATH
LD_PRELOAD
LD_DEBUG
2.6 一些相关工具
2.6.1 readelf
ELF(Executable and Linking Format)定义了目标文件内部信息如何组成和组织的文件格式。内核会根据这些信息加载可执行文件,根据该文件可以知道从文件哪里获取代码,从哪里获取初始化数据,在哪里应该加载共享库等信息。
readelf就是linux下展示elf文件内容的命令。本文中使用
-d --dynamic Display the dynamic section (if present)参数展示库的使用情况。$ readelf -d demo_share Dynamic section at offset 0x798 contains 21 entries: Tag Type Name/Value 0x0000000000000001 (NEEDED) Shared library: [libhello.so.0] 0x0000000000000001 (NEEDED) Shared library: [libc.so.6] 0x000000000000000c (INIT) 0x400488 ...其中标记为NEEDED的就是依赖的库。
2.6.2 ldd
ldd - print shared object dependencies.
同样,ldd命令也是用来查看程序的依赖。
$ ldd demo_share
	linux-vdso.so.1 =>  (0x00007ffc18fea000)
	libhello.so.0 => ./libhello.so.0 (0x00007f490b5b1000)
	libc.so.6 => /lib64/libc.so.6 (0x00007f490b21d000)
	/lib64/ld-linux-x86-64.so.2 (0x00007f490b7b2000)
ldd同样也能看到程序依赖的库文件。
2.6.3 ldconfig
ldconfig - configure dynamic linker run-time bindings.
ldconfig是用来配置运行时动态链接的绑定。
2.6.4 strace
strace - trace system calls and signals
这个后续会专门总结。
2.6.5 nm
nm - list symbols from object files
The nm(1) command can report the list of symbols in a given library. It works on both static and shared libraries. For a given library nm(1) can list the symbol names defined, each symbol’s value, and the symbol’s type. It can also identify where the symbol was defined in the source code (by filename and line number), if that information is available in the library (see the -l option).
3. 自定义库示例
有了上面的理解和基础,我们实际去,例子来自tldp
首先是文件
libhello.c和libhello.h/* libhello.c - demonstrate library use. */ #include <stdio.h> void hello(void) { printf("Hello, library world.\n"); }/* libhello.h - demonstrate library use. */ void hello(void);然后是调用库文件的程序
demo.c/* demo.c -- demonstrate direct use of the "hello" routine */ #include "libhello.h" int main(void) { hello(); return 0; }3.1 编写并使用静态库
编译打包生成静态库文件
$ gcc -Wall -g -c -o libhello-static.o libhello.c
$ ar rcs libhello-static.a libhello-static.o
使用静态库
$ gcc -Wall -g -c demo.c -o demo.o
$ gcc -g -o demo_static demo.o -L. -lhello-static
$ ./demo_static
Hello, library world.
3.2 编写并使用共享库
编译生成共享库文件
$ gcc -fPIC -Wall -g -c libhello.c
$ gcc -g -shared -Wl,-soname,libhello.so.0 -o libhello.so.0.0 libhello.o -lc
安装、链接共享库
$ /sbin/ldconfig -n .
$ ln -sf libhello.so.0 libhello.so
使用共享库
$ gcc -Wall -g -c demo.c -o demo.o
$ gcc -g -o demo_share demo.o -L. -lhello
$ LD_LIBRARY_PATH="." ./demo_share
Hello, library world.
3.3 使用动态加载库
使用动态加载库源码
/* demo_dynamic.c -- demonstrate dynamic loading and
   use of the "hello" routine */


/* Need dlfcn.h for the routines to
   dynamically load libraries */
#include <dlfcn.h>

#include <stdlib.h>
#include <stdio.h>

/* Note that we don't have to include "libhello.h".
   However, we do need to specify something related;
   we need to specify a type that will hold the value
   we're going to get from dlsym(). */

/* The type "simple_demo_function" describes a function that
   takes no arguments, and returns no value: */

typedef void (*simple_demo_function)(void);


int main(void) {
 const char *error;
 void *module;
 simple_demo_function demo_function;

 /* Load dynamically loaded library */
 module = dlopen("libhello.so", RTLD_LAZY);
 if (!module) {
   fprintf(stderr, "Couldn't open libhello.so: %s\n",
           dlerror());
   exit(1);
 }

 /* Get symbol */
 dlerror();
 demo_function = dlsym(module, "hello");
 if ((error = dlerror())) {
   fprintf(stderr, "Couldn't find hello: %s\n", error);
   exit(1);
 }

 /* Now call the function in the DL library */
 (*demo_function)();

 /* All done, close things cleanly */
 dlclose(module);
 return 0;
}
编译使用动态库
$ gcc -Wall -g -c demo_dynamic.c
$ gcc -g -o demo_dynamic demo_dynamic.o -ldl
$ LD_LIBRARY_PATH="." ./demo_dynamic
Hello, library world.
3.4 一些对比
程序在使用静态库的时候,会将静态库编译到程序中,会导致编译后的程序比较大。
而程序在使用动态库非静态编译时,并没有将库文件加入到编译后的程序,能够相对节省空间。
下面我们通过工具来看看具体的情况。
3.4.1 程序使用静态库编译
通过readelf工具可以看到demo_static不依赖
$ readelf -d demo_static

Dynamic section at offset 0x6f8 contains 20 entries:
  Tag        Type                         Name/Value
 0x0000000000000001 (NEEDED)             Shared library: [libc.so.6]
 ...
3.4.2 程序使用动态库动态编译
通过readelf工具可以看到demo_share还依赖libhello.so
$ readelf -d demo_share

Dynamic section at offset 0x798 contains 21 entries:
  Tag        Type                         Name/Value
 0x0000000000000001 (NEEDED)             Shared library: [libhello.so.0]
 0x0000000000000001 (NEEDED)             Shared library: [libc.so.6]
 ...
3.4.3 程序使用动态库静态编译
使用readelf查看demo_dynamic的依赖库和上面共享库一致。
3.4.4 程序全静态编译
$ gcc -g -o demo_static_compile_static demo.o -L. -lhello-static -static
$ ./demo_static_compile_static
Hello, library world.
3.4.5 各种方式编译后程序对比
至此,我们现在编译出来的有四个可执行程序,即 静态编译:
demo_static; 共享编译:demo_share; 动态加载编译:demo_dynamic; 全静态编译:demo_static_compile_static;分析他们大小可以看到:全静态编译生成的文件最大,因为他将c的库以及libhello都编译进去了;共享库编译生成的文件最小,比静态编译生成的文件要小一些,毕竟静态编译会将libhello编译到可执行程序中。
$ ls -lh demo_*
-rwxrwxr-x 1 gongmh gongmh  11K Nov 17 08:12 demo_dynamic
-rwxrwxr-x 1 gongmh gongmh 7.5K Nov 17 08:07 demo_share
-rwxrwxr-x 1 gongmh gongmh 7.9K Nov 17 08:05 demo_static
-rwxrwxr-x 1 gongmh gongmh 746K Nov 17 14:16 demo_static_compile_static
$ size demo_* text data bss dec hex filename 1902 548 24 2474 9aa demo_dynamic 1382 508 16 1906 772 demo_share 1205 492 16 1713 6b1 demo_static 678611 5792 10464 694867 a9a53 demo_static_compile_static4. 总结
实际中使用库的方法可能各有不同,不一定哪种方法就好,哪种就差。需要具体根据实际的需要选择使用。全静态编译不一定就差,毕竟相对于如今动辄几十G内存的服务器来说,库文件引起的程序大小增加,可以忽略不计了。本文只是总结梳理了一下库文件的一些基础知识和普通使用方法,具体还是需要根据实际项目需要去选择。个人水平有限,有问题欢迎交流指正。
5. 参考
- https://en.wikipedia.org/wiki/Library_(computing)
- http://tldp.org/HOWTO/Program-Library-HOWTO/index.html
-
socket编程中服务端重启时bind失败
在做socket通信时,可能会遇到程序关掉后,重新启动的时候报bind失败的错误,然后等一段时间后启动就正常了。
bind失败的原因很简单,就是关闭的进程未将端口资源完全释放,新进程bind的时候自然就失败了。
通过netstat看到,关闭程序后,程序使用的端口还处于TIME_WAIT状态,我们通过实际的例子来看看。顺着这个例子,也学习一下tcp的TIME_WAIT。
1. 示例准备
启动一个简单的ECHO server进行测试,ECHO只简单对client的消息进行回显。
/*******************************************************************************
 * File Name         : echo.c
 * Desc              : echo client msg
 * Author            : gongmh
 * Create Time       : 2018年11月14日22:45:34
*******************************************************************************/
#include <sys/socket.h>
#include <netinet/in.h>
#include <stdio.h>
#include <string.h>

#define SERVER_PORT 8080

int main(int argc, char **argv) {

    // 1. create
    int listenFd = socket(AF_INET, SOCK_STREAM, 0);
    if (listenFd < 0) {
        fprintf(stderr, "Failed to create listen socket");
        return 1;
    }

    // //reuse socket
    // int reuse = 1;
    // setsockopt(listenFd, SOL_SOCKET, SO_REUSEADDR, &reuse, sizeof(reuse));

    struct sockaddr_in listenAddr;
    memset(&listenAddr, 0, sizeof(listenAddr));
    listenAddr.sin_family = AF_INET;
    listenAddr.sin_addr.s_addr = INADDR_ANY;
    listenAddr.sin_port = htons(SERVER_PORT);

    // 2. bind
    if (bind(listenFd, (struct sockaddr*)&listenAddr, sizeof(listenAddr)) < 0) {
        fprintf(stderr, "Bind failed.");
        return 1;
    }

    // 3. listen
    if (listen(listenFd, 5) < 0) {
        fprintf(stderr, "Listen socket failed.");
        return 1;
    }

    struct sockaddr_in client;
    socklen_t len = sizeof(client);

    while(1) {
        // 4. accept
        int acceptFd = accept(listenFd, (struct sockaddr*)&client, &len);
        if(acceptFd < 0) {
            fprintf(stderr, "Accept socket failed.");
            continue;
        }

        char recvBuf[1024];
        char sendBuf[1050];

        // 5. read & write
        while(1) {
            ssize_t readSize = read(acceptFd, recvBuf, sizeof(recvBuf)-1);
            if(readSize <= 0) {
                fprintf(stderr, "Read socket failed.");
                break;
            }

            recvBuf[readSize] = 0;
            sprintf(sendBuf, "Server: %s", recvBuf);
            write(acceptFd, sendBuf, sizeof(sendBuf));
        }
    }

    return 0;
}
编译启动ECHO服务,
[gongmh@f92432f51628 ~]$ gcc -o echo echo.c & ./echo在另一终端通过telnet连接ECHO服务,
[gongmh@f92432f51628 ~]$ telnet 127.0.0.1 8080
Trying 127.0.0.1...
Connected to 127.0.0.1.
Escape character is '^]'.
hello server
client: hello server
然后关闭服务ECHO程序,再次启动ECHO,程序报bind错误,不能正常启动。
[gongmh@f92432f51628 ~]$ ./echo
Bind failed.
2. 现象分析
通过netstat来分析一下为什么会报错,首先ECHO程序启动后,还未有telnet client连入前,8080端口处于LISTEN状态。
[gongmh@f92432f51628 ~]$ netstat -anlp
(Not all processes could be identified, non-owned process info
 will not be shown, you would have to be root to see it all.)
Active Internet connections (servers and established)
Proto Recv-Q Send-Q Local Address               Foreign Address             State       PID/Program name
tcp        0      0 0.0.0.0:8080                0.0.0.0:*                   LISTEN      21083/./echo
客服端通过telnet连接到服务端后,会增加一条链接已建立ESTABLISHED的记录。
[gongmh@f92432f51628 ~]$ netstat -anlp
(Not all processes could be identified, non-owned process info
 will not be shown, you would have to be root to see it all.)
Active Internet connections (servers and established)
Proto Recv-Q Send-Q Local Address               Foreign Address             State       PID/Program name
tcp        0      0 0.0.0.0:8080                0.0.0.0:*                   LISTEN      21083/./echo
tcp        0      0 127.0.0.1:8080              127.0.0.1:46954             ESTABLISHED 21083/./echo
tcp        0      0 127.0.0.1:46954             127.0.0.1:8080              ESTABLISHED 21405/telnet
当服务端关闭后,LISTEN状态的记录已经不存在了,但是ESTABLISHED的记录状态变为TIME_WAIT。
这条TIME_WAIT记录会持续一段时间才会删除,可以看到,正是在这段时间内重新启动服务端,才会导致bind失败。
netstat -anlp
(Not all processes could be identified, non-owned process info
 will not be shown, you would have to be root to see it all.)
Active Internet connections (servers and established)
Proto Recv-Q Send-Q Local Address               Foreign Address             State       PID/Program name
tcp        0      0 127.0.0.1:8080              127.0.0.1:46954             TIME_WAIT   -
3. 抓包分析
通过tcpdump抓包,分析一下整个通信流程.
[root@f92432f51628 /]# tcpdump -i any port 8080 -w /tmp/bind_error.pcap -vvv通过包分析软件,例如wireshark,来分析一下抓取的包。
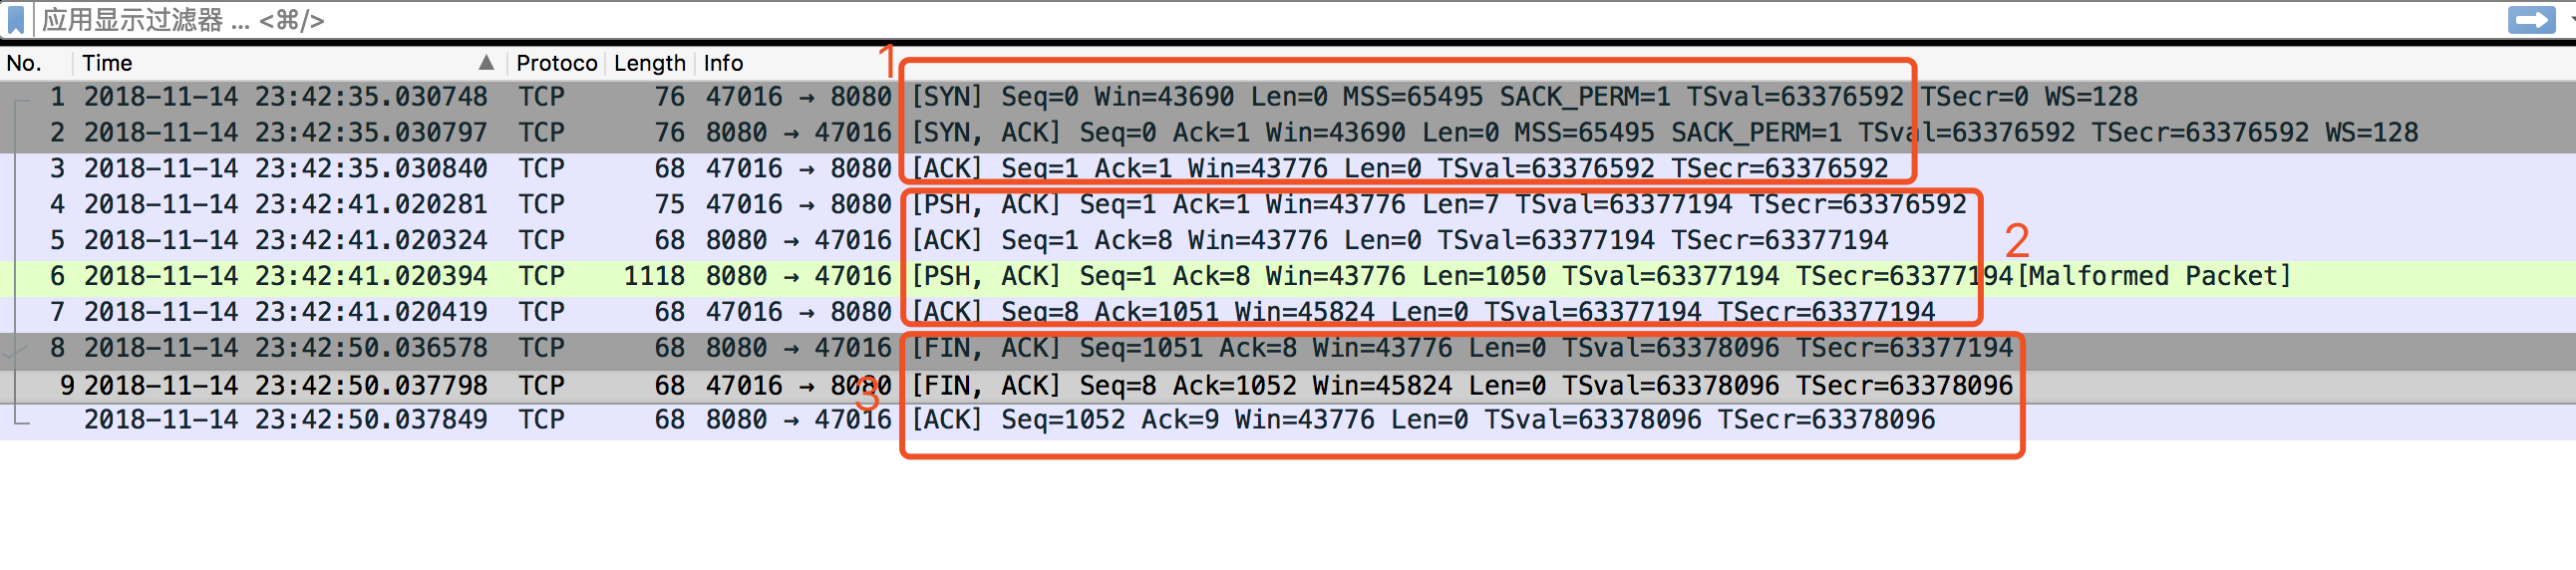
图中1即为tcp建立链接的3次握手过程,2是服务端和客户端通信的过程,最后3是断开链接的过程。

从图中3可以看到是8080端口主动发起的FIN动作,根据TCP的规定,主动断开链接的一端,会进入到TIME_WAIT状态。
最终导致服务端8080端口未释放,服务不能正常重启。
4. TIME_WAIT分析
为什么要有TIME_WAIT状态?TCP中说明了TIME_WAIT。
 TIME-WAIT S/C
  主动关闭端接收到FIN后,就发送ACK包,等待足够时间以确保被动关闭端收到了终止请求的确认包。【按照RFC793,一个连接可以在TIME-WAIT保证最大四分钟,即最大分段寿命(maximum segment lifetime)的2倍】
下面我们看一下为什么要引入TIME_WAIT状态。(by stackoverflow)
A socket has a send buffer and if a call to the send() function succeeds, it does not mean that the requested data has actually really been sent out, it only means the data has been added to the send buffer. For UDP sockets, the data is usually sent pretty soon, if not immediately, but for TCP sockets, there can be a relatively long delay between adding data to the send buffer and having the TCP implementation really send that data. As a result, when you close a TCP socket, there may still be pending data in the send buffer, which has not been sent yet but your code considers it as sent, since the send() call succeeded. If the TCP implementation was closing the socket immediately on your request, all of this data would be lost and your code wouldn’t even know about that. TCP is said to be a reliable protocol and losing data just like that is not very reliable. That’s why a socket that still has data to send will go into a state called TIME_WAIT when you close it. In that state it will wait until all pending data has been successfully sent or until a timeout is hit, in which case the socket is closed forcefully.
上面主要是说,TCP通信中,应用程序调用send()后,并没有真正的发送出去,而是放在send buffer中,添加到buffer中的时间和真正发送出去可能会一个相对长的延时。TCP作为一个可靠协议,因此当关闭一个TCP socket时,TCP增加一个TIME_WAIT状态,等待对端buffer中的数据成功发送。
5. 解决方案
通过设置SO_REUSEADDR来设置socket忽略处于TIME_WAIT状态的链接,下面我们实际看下。
The question is, how does the system treat a socket in state TIME_WAIT? If SO_REUSEADDR is not set, a socket in state TIME_WAIT is considered to still be bound to the source address and port and any attempt to bind a new socket to the same address and port will fail until the socket has really been closed, which may take as long as the configured Linger Time. So don’t expect that you can rebind the source address of a socket immediately after closing it. In most cases this will fail. However, if SO_REUSEADDR is set for the socket you are trying to bind, another socket bound to the same address and port in state TIME_WAIT is simply ignored, after all its already “half dead”, and your socket can bind to exactly the same address without any problem. In that case it plays no role that the other socket may have exactly the same address and port. Note that binding a socket to exactly the same address and port as a dying socket in TIME_WAIT state can have unexpected, and usually undesired, side effects in case the other socket is still “at work”, but that is beyond the scope of this answer and fortunately those side effects are rather rare in practice.
也就是说,如果没有设置SO_REUSEADDR,处于TIME_WAIT的socket仍然认为绑定了地址和端口,其他socket尝试绑定这个地址和端口时都会失败。如果设置了SO_REUSEADDR,socket绑定地址端口时,会自动忽略处于TIME_WAIT状态的地址和端口。这可能会带来一些副作用,但是在实际中很少出现问题。
在程序层面,通过设置socket为,即打开上面源码中的注释。
    //reuse socket
    int reuse = 1;
    setsockopt(listenFd, SOL_SOCKET, SO_REUSEADDR, &reuse, sizeof(reuse));
再次编译执行,通过netstat可以看到,能够正常重启服务端。
[gongmh@f92432f51628 ~]$ netstat -anlp
(Not all processes could be identified, non-owned process info
 will not be shown, you would have to be root to see it all.)
Active Internet connections (servers and established)
Proto Recv-Q Send-Q Local Address               Foreign Address             State       PID/Program name
tcp        0      0 0.0.0.0:8080                0.0.0.0:*                   LISTEN      21490/./echo
tcp        0      0 127.0.0.1:8080              127.0.0.1:47024             TIME_WAIT   -
tcp        0      0 127.0.0.1:8080              127.0.0.1:47026             ESTABLISHED 21490/./echo
tcp        0      0 127.0.0.1:47026             127.0.0.1:8080              ESTABLISHED 21491/telnet
另外在linux系统层面,可以修改linux内核参数,缩短TIME_WAIT的时间等,但这不是本文要讨论的内容了。到此,就了解了程序重启bind失败的原因及解决方案。
-
stress介绍
stress介绍
1. stress简介
stress是一个构造系统负载的工具,能够产生对cpu、内存、I/O、磁盘等产生负载。并且stress是用c语言开发的,非常精简。stress并不是系统压测工具[1]。
At present stress has worker types for processor, memory, I/O, and disk.
2. 安装
安装方式很常规,如下所示。需要注意的是要提前安装dev tools。
$ wget http://people.seas.harvard.edu/~apw/stress/stress-1.0.4.tar.gz

$ tar -zxvf stress-1.0.4.tar.gz

//请提前安装dev tools
//yum groupinstall "Development tools"
$ cd stress-1.0.4 && ./configure && make && make install
3. 使用
安装完成后,我们可以看到
$ stress
`stress' imposes certain types of compute stress on your system

Usage: stress [OPTION [ARG]] ...
 -?, --help         show this help statement
     --version      show version statement
 -v, --verbose      be verbose
 -q, --quiet        be quiet
 -n, --dry-run      show what would have been done
 -t, --timeout N    timeout after N seconds
     --backoff N    wait factor of N microseconds before work starts
 -c, --cpu N        spawn N workers spinning on sqrt()
 -i, --io N         spawn N workers spinning on sync()
 -m, --vm N         spawn N workers spinning on malloc()/free()
     --vm-bytes B   malloc B bytes per vm worker (default is 256MB)
     --vm-stride B  touch a byte every B bytes (default is 4096)
     --vm-hang N    sleep N secs before free (default none, 0 is inf)
     --vm-keep      redirty memory instead of freeing and reallocating
 -d, --hdd N        spawn N workers spinning on write()/unlink()
     --hdd-bytes B  write B bytes per hdd worker (default is 1GB)

Example: stress --cpu 8 --io 4 --vm 2 --vm-bytes 128M --timeout 10s

Note: Numbers may be suffixed with s,m,h,d,y (time) or B,K,M,G (size).
参数简单说明:
-c // 增加process负载, 主要调用sqrt()
-i // 增加I/O负载, 主要调用sync()
-m // 增加memory负载, malloc()/free()
-d // 增加disk负载, write()/unlink()

-t // 执行命令的超时时间
-v // 显示debug信息
-q // 只显示错误信息
4. 实例
针对1核的cpu,我们做如下测试:
(1) cpu负载
$ stress -c 1可以看到cpu的stress进程已经占满了cpu

(2) mem负载
$ stress --vm 1 --vm-bytes 800M --vm-hang 0 --vm-keep
(3) io负载
$ stress -i 1(4) 磁盘负载
$ stress -d 1
-
Go类型断言
Golang中类型断言主要体现两种方式:
Type assertions和Type switches,下面我们分别进行分析。Type assertions
对于==接口类型==的表达式x和类型T,Go的类型断言可表示如下,
x.(T)类型断言将断言变量x不为nil并且x中值的类型是T。如果T不是接口类型,x.(T)断言x的动态类型与T相同;如果T是接口类型,x.(T)断言x的动态类型实现了接口T。如果断言成立,表达式的值是存储在x中的值,并且其类型为T;如果断言失败,则会发生运行时panic。
var x interface{} = 7   //x动态类型是int,值为7
i := x.(int)            //i的类型是int,值为7
j := x.(float64)        //panic
类型断言在赋值或初始化的时候,会产生一个额外的bool值,即如果断言成功ok为true。否则是false,并且v的值是类型T的零值,此时不会发生panic。
v, ok := x.(T)即,如下示例
    var value interface{}
    value = "string"
    if str, ok := value.(string); ok {
        fmt.Printf("%T  %v", str, str)
    }
    if i, ok := value.(int); ok {
        fmt.Printf("%T  %v", i, i)
    }
Type switches
Type switches比较的是变量的类型而不是值 ,使用保留字
type作为断言的参数。即,switch newval := value.(type) { case int : //do something default : //do something }需要注意value是interface,变量newval类型是转换后的类型。下面我们看一下具体的例子,
package main

import "fmt"

type mystruct struct {
    string
}

func main() {
    //v := 3.12     //case float
    //var v mystruct    //case mystruct
    var v interface{}   //case nil

    checkType(v)

    fmt.Printf("\n%v  %T", v, v)
}

func checkType(v interface{}) {
    //switch v.(type) {
    switch t := v.(type) {
    case *int:
        *t = 10 //change value
        fmt.Println("\rIn *int")
    case float64:
        t = 20 //not change value
        fmt.Println("\rIn float64")
    case mystruct:
        fmt.Println("\rIn mystruct")
    case nil:
        fmt.Println("\rIn nil")
    default:
        fmt.Println("\rIn default")
    }
}
总结
使用
x.(typename)时需要注意以下问题,- x必须是
interface{} typename为具体类型的时候,必须进行comma, ok判断,否则容易产生panictypename是type时,表达式只能用在switch中,另外对x的数据做操作的时候,需新定义变量t, 即t := v.(type)
- x必须是